
Manual
Curio
Dynamic Texture Generator
Have you downloaded ALL of your files?
Please ensure you have DOWNLOADED ALL FILES associated with your Plugin BEFORE BEGINNING INSTALL PROCESS. This includes the Plugin Installer, Sample Archive, Manual & anything else you can download. You can find all of this in the DOWNLOADS SECTION of your profile.
Install Guide
1. Run Your Installer
Double-Click your installer file to initiate your installation. Once running, follow the prompted instructions to install your files.
- Files included for your OS:
MAC: VST3 & AU
WIN: VST3
Files will be installed to the locations below:
MAC:
AU: Macintosh HD:\Library\Audio\Plug-Ins\Components
VST3: Macintosh HD:\Library\Audio\Plug-Ins\VST3
WINDOWS:
VST3: C:\Program Files\Common Files\VST3
Note: You can relocate any of these files after installation
2. Download & Unzip Your Samples Archive
To keep your plugin size small and minimize CPU usage, your Samples Archive is included separately. Download & Unzip this file to a location of your choosing. Please remember where you put it as you will need to direct the plugin to this folder.
3. Open Your DAW & Load the Instrument
Open your DAW and scan for new Plugins. Once your new Plugin is visible, create a new MIDI track and insert the Plugin.
4. Connect Your Sample Archive
Once you open the Plugin, it will immediately ask you to provide the necessary samples for the instrument.
Your screen will read: Choose Sample Folder
- Click the “Choose Sample Folder” button (it will ask Have you installed the samples yet, Click “OK” to continue)
- Navigate to the Samples Archive folder you downloaded previously
- Select the Samples Archive folder (contains “.ch1” or “.wav” sample files)
- Close the Plugin & open a new instance (even if it ask for the sample folder again)
NOTE: If you relocate the extracted samples archive, you will have to redirect the Plugin to the folder again. Simply click the “Change Sample Folder Location” button in the settings or preset popup panel.
Troubleshooting
1. Sample Installation Error
Go to the folder that contains the configuration files for the sample library and delete all the files it contains. Then, reopen the sample library and everything should be just as it was before you extracted the samples.
The configuration files were created when you installed the software. The location of these files varies between operating systems.
MAC: /Library/User/Application Support/NNAudio/
WIN: /Users/username/AppData/Roaming/NNAudio/
2. Sample Folder Location
If at some point after installation you move the samples to a different location you will need to redirect the sample libraries search path.
You may be prompted to do this when you run the library after moving the samples or you can do it manually by clicking the FOLDER button near the Preset Bar navigation and clicking Change Sample Folder Location.
Need help? Contact us via our Website or [email protected]
Walkthrough
Welcome to Curio
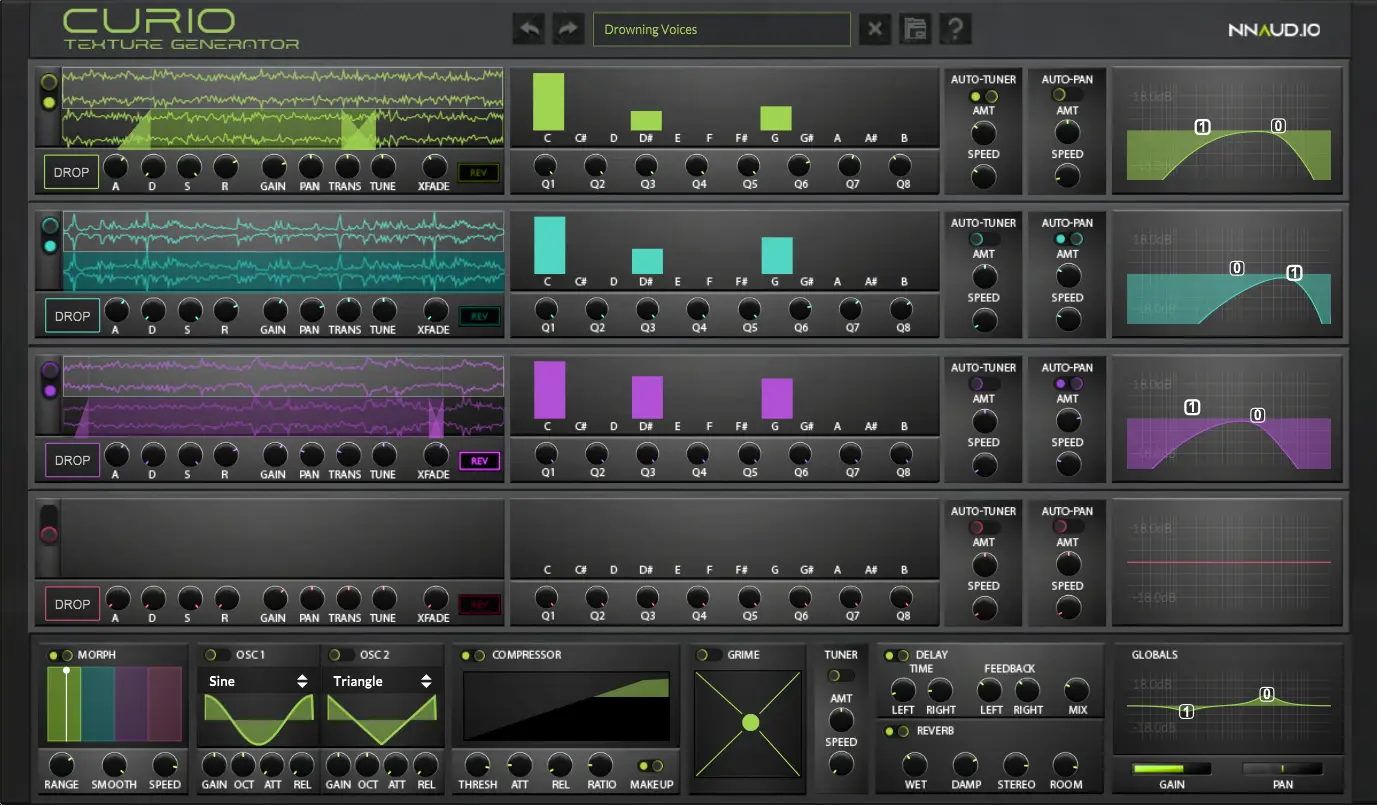
Curio is a Dynamic Texture Generator Plugin. It uses multiple resonant EQs & various effects to change any sample into a playable texture or drone. Below will give you a quick rundown of the Plugin, its functions & practical use.
1. Sampler Engines
Curio has 4 completely customizable Sampler Engines. Below are the included functions:
- Power
- Drop Your Own Samples
- Sample Range (Start & End)
- Loop Range (Start & End)
- Loop XFade
- Reverse Playback
- ADSR
- Gain
- Pan
- Transpose
- Detune
Use Your Own Samples
Drag-And-Drop your own WAV Samples into Curio for an even more unique sound. Curio can make ANY sample a playable texture or drone instrument.
Individual Sampler Effects
Each Sampler can have multiple effects added individually. These effects include:
- Auto Tuner (Automated Detune)
- Auto Pan (Automated Panner)
- Draggable EQ Panel
2. Key/Chord Sliders

This parameter controls multiple resonant EQ modules, each Key representing its own. Move these sliders up or down to adjust the gain of 8 EQ Bands per module (that’s 96 EQ Bands).
Use the Q Knobs to adjust the Q of each of these 8 Bands. The higher the Q, the more pronounced the selected band. The lower the Q, the further you stray from reality.
You can add a single key or add entire chords for a more enhanced sound.
3. Effects
Curio come stock with a host of unique, simple & powerful effect modules. Below is a list of them:
- Sample Morph (Unique Sampler Blender)
- This effect blends you engaged samplers dependent on the placement of the playbar. Change the Range (number of samplers), Smoothness and Speed of this effect to give your sound a unique vibe.
- x2 Oscillator Engines
- Glue Compressor + Makeup
- Grime (Strange Delay Module adds eerie layer)
- Tuner (Automated Detune)
- Delay
- Reverb
- Global EQ
- Global Gain
- Global Pan
4. Presets

Curio includes 40+ Stock Presets & Sound Starters. Use these directly in your project or as a starting point to create your own textures.
Save presets with your own custom samples. Best practice is to save the samples you want to use in the downloaded Sample Archive folder. This way, the plugin will always have direct access to the samples location.
Compatibility

WIN

MAC
Operating System
Windows 10+
Mac Mojave 10.14+
System Requirements
4GB RAM | 250MB Disk Space
Format Type
VST3 | AU
Download Size
Installer: 35MB | Samples: 114MB
Delivery Format
WIN: EXE | MAC: PKG
DAW Compatibility
Works with all DAWs except Pro-Tools